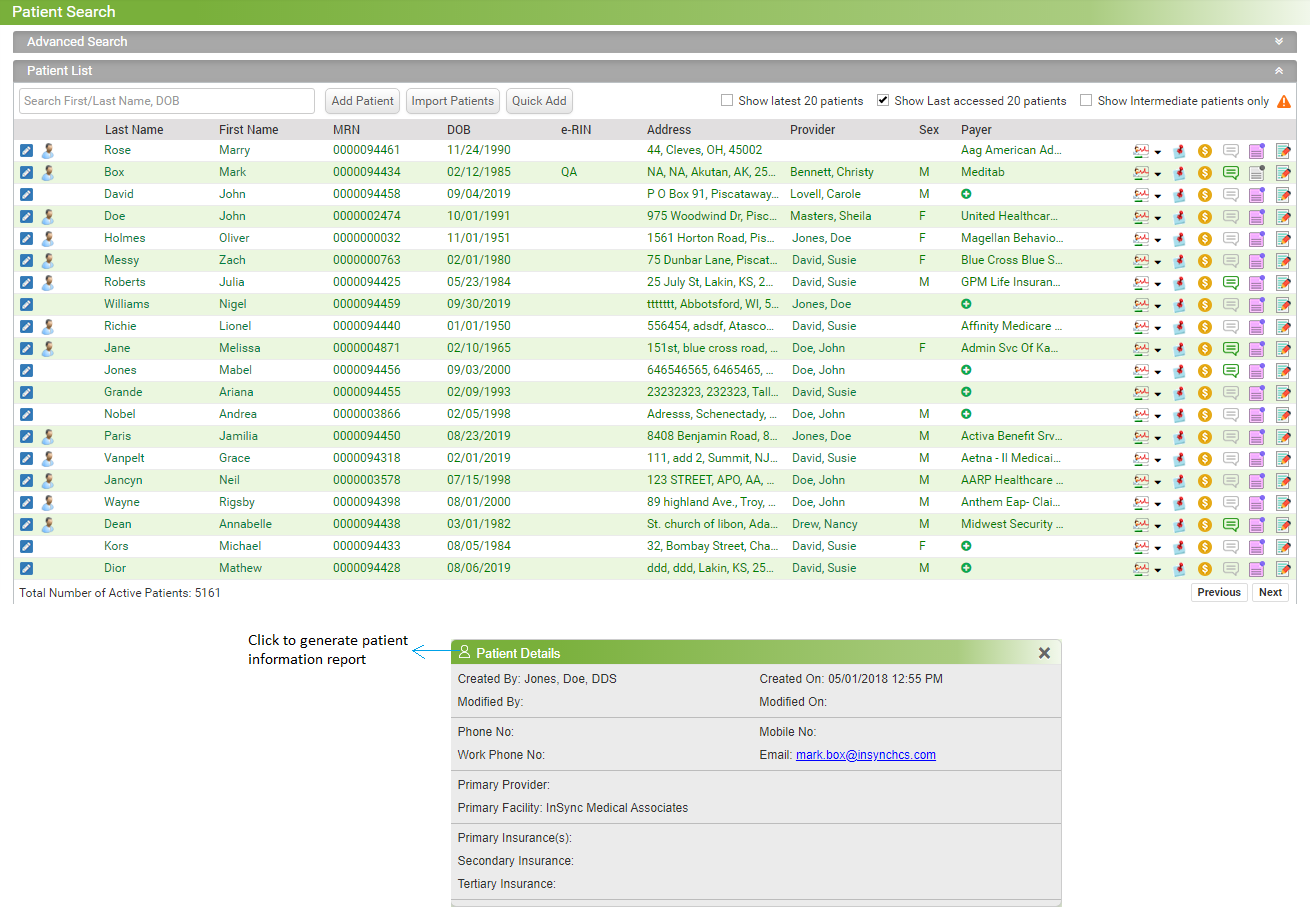
Practice users can search the patients added in the system to work on them. Patients can be searched in two ways; Smart Search and Advance Search.
To perform a Smart Search:
| 1. | Start typing the patient name and the list of matching patients is displayed below. |
| 2. | Select any patient from the list to access that patient's record. |
To perform Advanced Search:
| 1. | Expand the Advanced Search tab. |
| 2. | Enter search criteria, such as Date of Birth, MRN, Claim#, Policy#, Phone#, SSN, and so on as per the requirement. |
| 3. | Click Search to view results. |
Notes:
| • | Any and all patient information must be entered exactly as it appears in the patient record for the patient to appear in the search results. |
| • | When searching patients by address, you can enter patient's Address 1, Address 2, City/Location, State/Region, or Postal Zip code. |
Click any column name to sort the patient list accordingly. You can sort the patient list based on patient name, MRN, DOB, Sex, Provider, Address, External MRN, and Payer.
InSync users can perform the following shortcuts from the Patient Search screen:
| • | Click the  icon next to patient listing to edit patient information. This navigates to the “Patient Information” screen of patient demographics. icon next to patient listing to edit patient information. This navigates to the “Patient Information” screen of patient demographics. |
| • | Click the  icon to view the important note added for the patient. icon to view the important note added for the patient. |
| • | Hover your mouse pointer over the  icon to view the insurance eligibility of the patient. icon to view the insurance eligibility of the patient. |
| • | Patient name mentioned with '(P)' indicates that this is a primary patient of the family. To view family members' details click  . . |
| • | Click  icon to add the payer details. icon to add the payer details. |
Note: If the payer details are already added, the payer name appears instead of the Add Payer link. On clicking the payer name, you will be navigated to the Insurance Details screen.
| • | Click  to navigate to the Facesheet screen. to navigate to the Facesheet screen. |
| • | Click the To Do icon  to add a To Do. to add a To Do. |
| • | Click the  in the Facesheet column to start new encounter or access patient's recent 5 encounters. in the Facesheet column to start new encounter or access patient's recent 5 encounters. |
| • | Click the  icon to view the financial summary of the patient. icon to view the financial summary of the patient. |
| • | Click the  icon to add a note to a patient. Notes can be filed under “Patient Notes,” “Financial Notes,” or “General Notes”. icon to add a note to a patient. Notes can be filed under “Patient Notes,” “Financial Notes,” or “General Notes”. |
| • | Click the  icon to view or add a new sticky note. icon to view or add a new sticky note. |
| • | Click the  icon to view who created or modified the patient details and when. It also displays patient's additional information that includes mobile number, phone number, work number, e-mail, primary facility, primary provider, and insurances. icon to view who created or modified the patient details and when. It also displays patient's additional information that includes mobile number, phone number, work number, e-mail, primary facility, primary provider, and insurances. |
| • | The “Import Patient(s)” button helps you to import the patient details when you want to migrate from another EMR system to InSync. You must contact the InSync EMR Support for details on interface configuration. The patient details to be imported in InSync from other systems are placed in the configured interface path in HL7 file format. Once the “Import Patient(s)” button is clicked, all the patient details are imported to InSync. The files that are not imported successfully can be viewed by clicking the “Unprocessed PM Files” link. On the Unprocessed PM Files screen, you can click the  icon to view the error status. icon to view the error status. |
| • | To generate Patient Information Report click on the Patient details  icon, pop up appears, click on icon that appears on the title bar to generate patient information report. icon, pop up appears, click on icon that appears on the title bar to generate patient information report. |


