Configuring Radiology Orders
The radiology tests performed manually are configured in this section.
To configure radiology orders:
| 1. | On the Treatment Plan Configuration screen, click the edit icon |
| 2. | In the Recommend Type panel, click the Radiology link. The master values with the radiology types are displayed on the right side. |
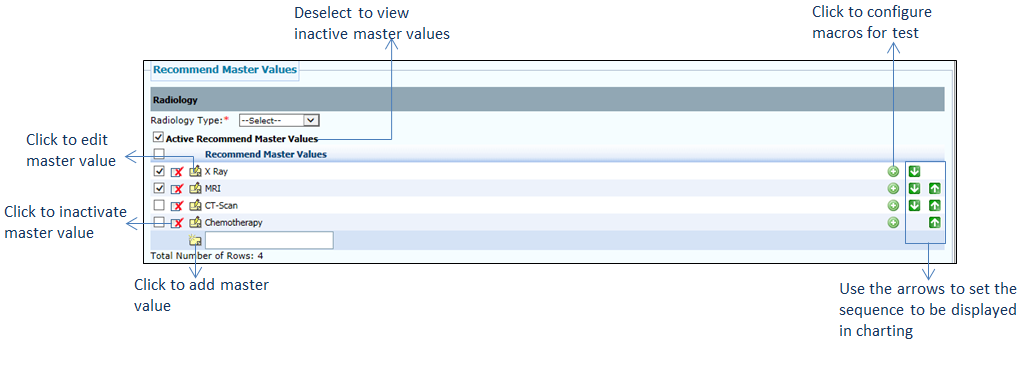
| 3. | In the Recommend Master Values panel, do the following: |
| • | Select the Radiology Type from the drop-down list of the associated tests. Once the radiology type is selected, the check box corresponding to the Radiology link in the left pane is selected. This is an indication that the radiology test is configured. |
| • | To add a new radiology type, do the following: |
| o | Enter the text in the Text field located below the Recommend Master Values column. |
| o | Click the |
| • | Select the check boxes corresponding to the tests you want to configure. |
| • | To add a new test to the radiology type, do the following: |
| o | Enter the test name in the Text field located below the Recommend Master Values column. |
| o | Start typing the CPT code and select it from the list displayed or select the CPT code by clicking the |
| o | Click the |
| • | Click the |
| • | Use the Up ( |
| • | To edit the master value details, click the edit icon |
| • | To inactivate the master value, click the inactivate icon |
| • | Deselect the Active Recommend Master Values check box to view the list of inactive master values. To reactivate it, click the |
| • | Click Save at the bottom of the screen to save the details. |

